
Set Up Chef Desktop in Three Easy Steps
Follow this process to install and configure your Chef Desktop Management and Compliance environment.
1. Download, Install and Configure Chef Workstation
Chef Workstation provides all the tools you need to start working with Chef Desktop, including knife, Chef InSpec and Cookstyle. Install it on your laptop.
After installing, configure Chef Workstation with knife. Answer the on-screen questions to auto-create the .chef/credentials configuration file that integrates your laptop with Chef Infra Server and Chef Automate
$ knife configure init-configOptionally, generate a Chef repo and your first cookbook:
$ cd ~
$ chef generate repo chef-repo
# cd ~/chef-repo/cookbooks
$ chef generate cookbook my-cookbook
2. Connect Chef Workstation to Chef Automate and Chef Infra Server
Chef Infra Server stores all your Chef code, including cookbooks and recipes, and distributes that content to all your on-prem, cloud and edge nodes.
If your organization already has modern Chef, contact your Chef Administrator to set up access credentials to use with Chef Workstation.
If you want to start from scratch, create a Linux VM or cloud instance, login as an elevated user, and run the following command to install both Chef Infra Server and Chef Automate:
$ sudo hostnamectl set-hostname $(hostname –f) && \
  sudo sysctl -w vm.max_map_count=262144 && \
  sudo sysctl -w vm.dirty_expire_centisecs=20000 && \
  ./chef-automate deploy --product automate --product infra-server
3. Configure Chef Automate
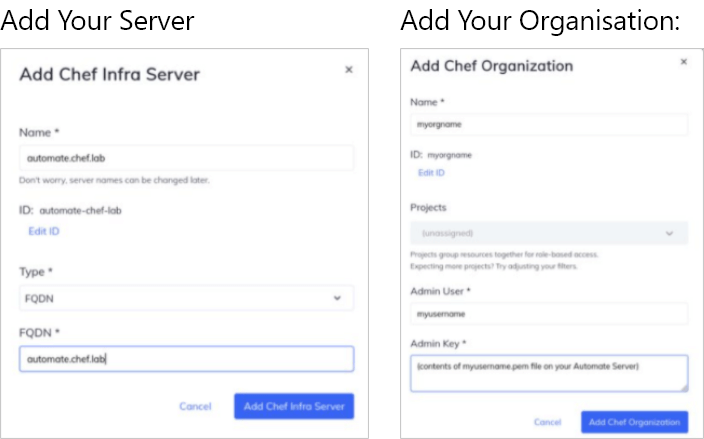
Log into your Chef Automate dashboard (URL, username and password available in ~/automate-credential.toml on your Automate server) and add your server under the Infrastructure tab:
Chef Infra Knowledgebase
Answer to developers most asked questions.
- Getting Started with Chef Infrastructure Management in 30 Minutes
- Chef Infra 101: The Road to Best Practices
- Gain Control and Visibility Into Your Linux Desktops
- Chef Desktop in 60 Seconds
- Manage Your Fleet with Chef Infra
- How to Set Up Chef Workstation, Create a Cookbook and Get Started with Compliance
- Compliance Phase Improvements
- Chef Infra in 60 seconds
- Chef Infra documentation
- Release notes